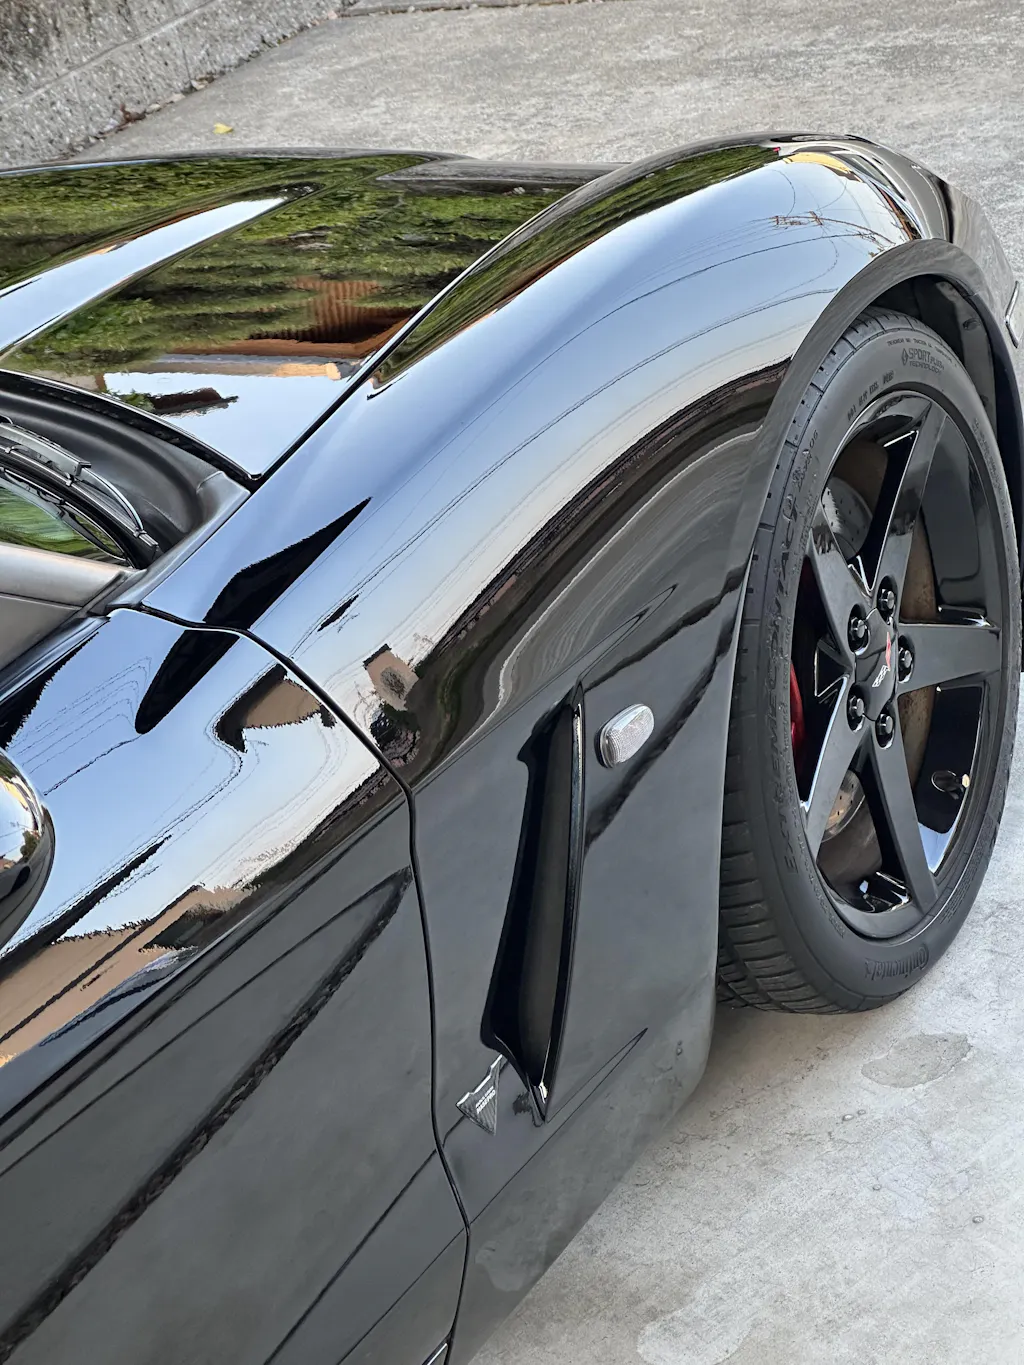
How to wash a car

The next few stages will teach you how to wash your car like a professional.

There are few automotive tasks more rewarding than a clean car, sparkling clean bodywork will make a huge difference.

Washing a car is a skill and very few people know how to do it properly and we are here to teach you how to protect your car for generations to come.

Below is a guide of how to wash your car properly as well as the things to avoid doing which will cause damage to the bodywork.


Setting up your supplies

Having to leave the job half way through to get more water or fetch supplies can cause soap or water to dry unevenly resulting in those nasty swirls and tide marks on a car's paintwork, so make sure you are prepared.

Exactly what you use is up to you ultimately but here's what we suggest you have on hand:

  • Three buckets

  • Grit guards

  • Snow Foam or Pre Wash

  • Brushes for cleaning wheels and arches

  • A gentle car shampoo

  • A sheepskin wash mitt

  • Microfibre towels, including at least one plush one

  • Quick Detailer Spray

  • Pre Wax Cleanser

  • Car Wax


Whilst there's certainly room for some personal preference in the above list – choose the cleaners and PH Neutral Car Shampoo that suits you for example – there are some items which are non-negotiable. In a nutshell, leave kitchen items such as paper towels, sponges and even worse scourers.

You will also need to ensure your car is cool and parked in a shady spot; if the bodywork is warm you will probably end up with uneven patches and spots despite your best efforts.


What's wrong with a standard sponge?!

Most car owners would happily plunge a standard sponge into a bucket of warm water before happily scrubbing away but in fact by doing so, you could be irrevocably damaging your paintwork.

The problem lies in the flat surface of the standard sponge which doesn't provide any room for grit particles to escape and instead forces them to scrape across the surface.

A dirty car will have dust and small particles of dirt on the surface and it is these things that you want to remove. As you put the flat surface of a sponge on your car's bodywork and wipe, you will indeed get rid of the dirt and grit but it will not have anywhere to escape to. Instead, the sponge will grind these particles backwards and forwards across your paintwork, inflicting tiny scratches and removing the gloss.

Chamois leather, another traditional item used to clean cars, suffers from a similar problem.

By contrast, a sheepskin mitt has a deep pile. Not only does this cushion the paintwork but it also allows the grit particles to sink away from the surface ensuring that they are not dragged forwards and backwards over the car's surface.


Do I really need three buckets?

It's a good idea to prepare at least three buckets to wash and clean your car. The minimum you should get ready is two – but you will then need to rinse one out before continuing. Therefore if you have three buckets, it can make life much easier.

The three buckets are used for cleaning the wheels, cleaning the car and rinsing. If you only have two buckets you will need to rinse one and re-fill it after you finish cleaning the wheels and the arches (which should be done first).

If you don't have a separate bucket for rinsing you will simply be wiping the same dirt that you just removed from the car back over it again! And if this happens, you can expect those dreaded swirls and scratches, as well as a dull finish regardless of how much wax you apply when it's dry.

At the bottom of each bucket, you should place a grit guard if you have one. This is particularly important for the rinse bucket as it will help to loosen and remove the abrasive grit before you dip your mitt back into the clean water of the wash bucket again.


The first steps

Now that you have prepared everything, it's time to make a start.

First of all, pre-treat the bodywork in any places where you have stubborn marks, splashes or dirt such as bird droppings or tree sap. You can either use a mild all-purpose cleaner or undiluted car detergent. The easiest way to apply is from a spray bottle; simply fill it up and spray directly onto the spots on your car which will need some encouragement to leave.

Leave this soaking in whilst you get on with the first main part of cleaning your car: the wheels.

Many people leave wheels until last because the water that flows down from the rest of the car's wash can help to lessen the grime. This is certainly true but when you are cleaning the residual dirt from your wheels, it's not uncommon for your clean paintwork above to get splashed with filthy water undoing all your hard work! For this reason, every professional car cleaner suggests starting with the wheels first.

You can either use regular car detergent or you can opt for a specialist wheel cleaner; the choice is yours. Whatever you do, don't be tempted to squirt in more cleaner than is recommended; you might think that this will give you superior cleaning power but in fact it could hamper its action and could instead strip some of the protective waxes from your car's paintwork.

Before you get down to the nitty gritty you will want to spray your wheels with a hose (and this is why you do them first!). This will loosen all of the dirt and debris you may have trapped in the spokes and arches. You might even want to consider eye protection for this part as you could be surprised at just what can come flying out!

Once your wheels have had a good hosing down, it's time to move on to cleaning them more thoroughly. The best way to do this is to use a dedicated brush but if you don't have one, then simply use a sponge (it's fine for this bit!) or a beaten up old mitt. Don't be tempted to use the same mitt as you plan on using for the rest of the car or else as you could end up with scratches from the very gritty dirt that your wheels will have collected.

There are all kinds of attachments and specialist brushes you can purchase but one of the easiest ways to get into all the nooks and crannies is with an old toothbrush. This is one of the simplest ways to get your wheels and the arches thoroughly clean.

Once you've done this, rinse the wheels down and you're finished! With this part at least...


The main part

Moving on to cleaning the rest of the car, first give the body a thorough spraying over with the hose. This should remove any loosened dirt and grime, as well as foreign bodies such as leaves. It's not generally recommended to hose down your engine as the pressure of the water can push through brittle or ageing seals and seep into the electrics (the best way to clean an engine is to put on some rubber glove and scoop any dirt and debris out).

When you are hosing down your car, pay particular attention to your windscreen wipers and the surrounding area as lots of dirt, dead bugs and leaves can collect there.

Now you are ready to move on to using your wash mitt. You should have a water and detergent mix in your wash bucket and plain water in your rinse bucket – make sure you don't mix up the two! Dip your mitt in the wash bucket and clean a small section of the bodywork at a time. Don't be tempted to do too much before rinsing off your mitt, a square of around three inches is the ideal size. Rub your mitt against the grit guard in the rinse bucket to ensure you get rid of as much of the dirt as possible before dipping the mitt back into your wash bucket to load it up with suds.

Clean your car from the roof and work downwards ensuring that you don't press too hard with the mitt at any time; this will help to prevent scratching and tarnishing of the paintwork. Your aim is to simply float the dirt away with the help of plenty of suds and lubrication and the soft surface of the mitt.

If there are any stubborn stains you can use gently pressure from your thumb nail through the mitt to encourage the removal but be careful not to scratch the paintwork. You can use another old toothbrush to get right into cracks and crevices to root out any dirt which has burrowed deep.

Horizontal surfaces should be washed in a front to back action whilst vertical surfaces should be washed up and down.

Once the car has been scrubbed thoroughly from top to bottom and all marks removed, give it one more quick wipe over with the suds-loaded mitt. This will help ensure you don't end up with any water spots; car detergent usually contains an anti-spotting agent unlike kitchen cleaners (another reason to leave them under the sink!)


For the final rinse get your hose back out again but this time minus the spray nozzle. You want a gentle stream of water which will cascade over the paintwork and allow all the suds to flow away. The hose should be kept very close to the car; a good tip is to hook your thumb over the lip to stop it hitting your paintwork if you misjudge the distance.


Drying off

Having done such a thorough job on cleaning your car, don't be tempted to let it simply dry in the sun. You will end up with tide marks and water spots and won't get the high shine gleam that really­ makes a car stand out.

In order to avoid getting tide marks or water spots, you will need to dry your car quickly before it starts to dry in patches. The easiest way to do this is to use a soft and fluffy microfibre cloth. This type of material is designed to hold its own weight in water many times over and is far superior to a regular towel which can just push the water around once it gets wet. If you have an air compressor giving your car the once over with this first can help cut down the drying time as well as reduce the possibility of spots. If you don't have this, just carry on drying your car by hand.

Spritzing one of your microfibre cloths with a small amount of detailing spray will add a touch of lubrication to the drying process and help to prevent spots. To begin the drying first take your cloth and gently drag it across the car. If you don't have much standing water, you can opt for a blotting motion instead.

To finish off any residual water spots use a plush microfibre cloth lightly sprayed with wax, the addition of this helps to prevent over-drying and encourages a super-shiny finish.

 Don't be tempted to resort to a chamois as you could end up with scratches.

 Once your car has been thoroughly dried all over, take another microfibre towel and use it to remove excess water from any hidden crevices such as door jambs and the bonnet. Don't be tempted to skip this step as droplets can drip down and cause patches and uneven spots on your paintwork.

 You shouldn't need to fully wax your car every time you wash it but you will need to inspect it for signs that a new coat is needed. When your car is rinsed, beads should form – if you didn't see this you will need to re-wax your bodywork.

 Conclusion

Washing a car is a job that needs care and attention if you want to avoid unsightly swirls and spots and more significantly causing potential damage to the bodywork.

Working through these steps methodically and prepping your equipment before beginning should help you to complete the task quickly and efficiently and provide you with a car that gleams effortlessly as a result!